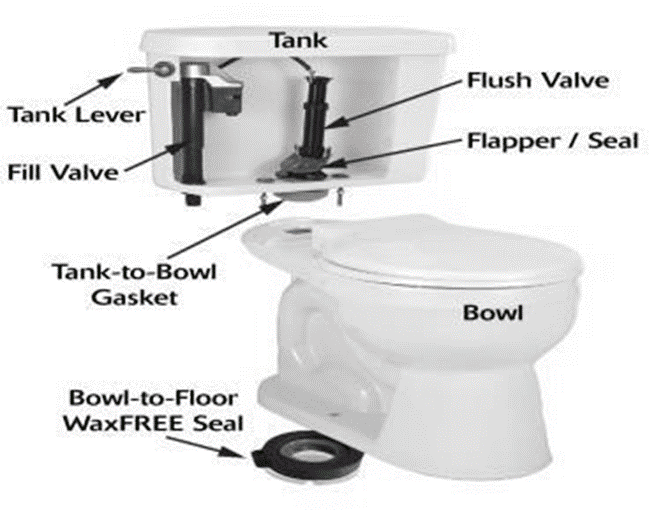
Your toilet comprises two main parts; the upper tank, which holds the water released when you flush the toilet, and the bowl unit, which rests on the floor. The bowl is made up of porcelain with no moving parts, and very rarely does it need repairs. The tank, however, is where most of the repairs happen. You'll be surprised at how easy it is to fix toilet problems.
Before you embark on any
repairs, you need to comprehend how a toilet works.
How Your Toilet Works
The tank above the toilet bowl holds a certain quantity of
water. When you flush your toilet, the water flows down fast through an opening
at the bottom of the tank and into the bowl. The force pushes the waste from
the bowl and into the drain, and finally into the sewer lines.
Two main parts in the tank make this possible: the fill
valve or ballcock and the flush valve.
The
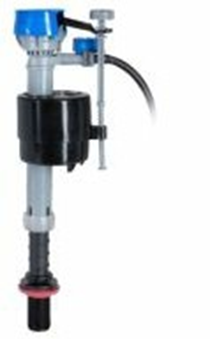
Toilet Fill Valve (Ballcock)
The toilet fill valve is the component that fills the tank
with water. It is located on the left side of the tank and is automatic. When
you flush and the water is released, the water level will fall. It will also
automatically shut off when all the water drains into the bowl. The water then
rises again to a specific level in the tank. The valve is operated by a
floating cup or floating ball, which moves up and down with the water level- it
all depends on your toilet's design. The non-floating fill valve operates by
sensing the pressure of the water at the bottom of the tank.
The toilet in your RV is lighter than regular toilets and
does not have a handle like a home toilet. Instead, it has a pedal that is
underneath the bowl. It is flushed by pressing the pedal with a foot, causing
freshwater to flow into the toilet, and a flap opens at the bowl's base. The
waste is flushed into the black tank.
Some common toilet problems that a beginner can repair
easily include:
· A
clogged toilet
· A leak
at the toilet base
· A
running toilet
· A
faulty flush valve
· A
ballcock that doesn't function properly
Below,
find three types of repairs that you can do by yourself.
Clearing Toilet Clog With a Toilet Plunger
An overflowing toilet due to clogging can be annoying. Such
a clog can cause the water to fill up the toilet and spill over onto your
floor. This is usually no cause for panic. It's a fairly effortless job.
Before you learn how to unclog a toilet, it will be a good
idea to understand what causes it to clog.
How
does the toilet get clogged?
There's a P-trap under your toilet that holds standing
water that acts as a trap and also prevents sewer gas odors from filling up the
air. Sometimes, objects get trapped in the P-trap, which includes toilet waste
or any other foreign object.
A toilet clog can quickly be cleared using a toilet
plunger. If that doesn't work, then use a toilet auger.
Tools
Needed
· Toilet
plunger
· Closet
plunger
Method
1. Use
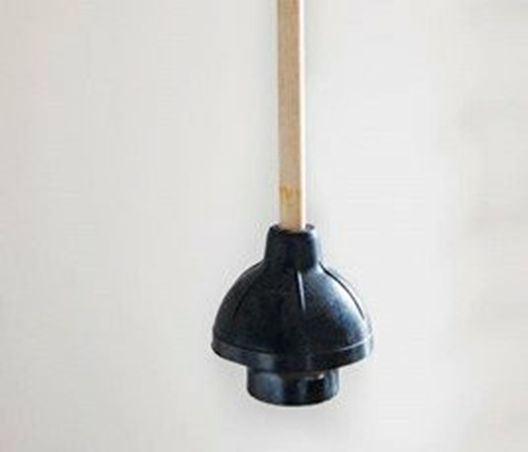
A Toilet Plunger (Also Called A Closet Plunger Or A Flanged Plunger)
This type of plunger looks like the cup plunger but is
slightly different in shape and design. It has a cup with a soft rubber flap
that fills out from inside the cup. The flap fits perfectly over the curved
toilet drain, providing the appropriate suction required.
The suction force in a toilet plunger is strong enough to
unclog an RV toilet if the clog is close to the top. If the clog is much deeper
down in the black tank, a plunger will not solve your problem.
This issue can be solved by pouring boiling water down the
toilet bowl and let it stay that way the whole night. You can break up a
stubborn clog by using boiling water in a tank that is not full yet.
Do not use the toilet plunger for your sink, and do not use
the cup plunger for your toilet. Check out the difference below so that you do
not confuse the two:
2. Prepare
the Plunger
Add more water into the toilet bowl so that it is half full
or as needed. This is done to secure a seal around the drain opening.
3. Position
the Plunger
Lower the plunger at an angle into the bowl so that the cup
fills with water. This increases the plunging force. Fit the cup properly over
the drain opening so that the flange is inside while the cup seals firmly
outside the hole.
4. Pump
the Plunger
Use powerful, swift thrusts to push the plunger up and down
the drain to loosen the clog. During all movements, maintain a good seal. As
the plunger comes up, it creates a suction effect to make the clog lose. As it
moves down, it pushes the clog down the drain.
Thrust it five or six times. When most of the water has
gone out of the bowl, most likely, the clog has cleared.
5. Test
it
Flush your toilet to test if it has cleared. If the bowl
appears like it will overflow, push down the flapper in the water tank. This
stops the water flow immediately from the tank into the bowl.
Repeat the flushing and plunging process until the clog has
cleared up.
Clearing the Clog With a Toilet Auger
1. Prepare the Auger
Pull back the auger cable so that the cable's tip is at the
end of the guide tube. Push in the guide tube into the toilet, allowing the
sweep elbow to rest at the bottom of the bowl and so that the cable end reaches
farther into the drain opening.
2. Crank the Auger
By cranking the auger's handle clockwise, push the cable
slowly into the toilet trap until it cannot go any further.
If need be, you might have to reverse the direction of the
crank to coax the cable through the curves of your toilet drain. Extend the
auger cable until you break through the clog.
3. Extract
the Cable
As you rotate the handle, drag the cable back slowly out of the toilet. Be gentle as you do this to avoid scratching the fixture. Make sure the clog has cleared by flushing the toilet.
How To Fix a Running Toilet
A running toilet is one of the common problems in homes,
not to mention how annoying it can be and all the water wasted. Fortunately, it
is very easy to fix this problem.
Before you start fixing your toilet, learn some basics on
how it works.
How the Toilet Works
Understanding the basics of how a toilet works will give
you an idea of what repairs are required. Here are the basic steps:
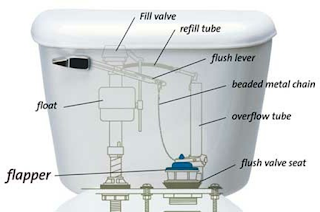
1. After you press the handle, a chain will lift a flap
(flapper), which allows the water in the tank to flow into the bowl. As the
tank is emptying, the flapper will drop and close the opening to start the
refill cycle again.
2. The float drops as the tank empties the water. The float
connects to the float valve, which opens when the float is down and closes when
the tank fills up.
3. At the centre of the tank is an overflow tube, which
helps in draining any excess water down into the bowl when the tank level gets
high. Besides this tube is a channel that the float valve sends water down into
the bowl when it refills again.
A toilet that doesn't stop running can result from various
reasons, including waterlogged float, a high water level, and a faulty flapper.
If none of these is the problem, then most likely, your toilet has a broken
valve. The ultimate solution is to replace it. Below are two ways to handle
this problem:
1. Check
if Your Flapper or Chain Is Faulty
A flapper refers to a cap made of plastic or rubber, which
helps in keeping water in your tank. With time, the flapper becomes brittle and
creates a faulty seal. When your tank cannot hold or refill water, it is
probably because of a sub-par flapper. The following are ways to troubleshoot
your flapper:
1. Check
the consistency of the flapper. In most instances, the
flapper has hardened and stopped creating an adequate seal. Feel the flapper to
establish if it is still soft and can hold back the water.
2. Check
the chain. If the chain in your water tank is too long, trim off the
excess part to avoid tangling. If the chain is rusty, replace it with a new
one.
3. Check
if there is a jam. Sometimes flappers get pinched at the hinges.
Adjust this so that it works as required.
4. Check
for alignment. Flappers can get dislodged, causing leaks.
Ensure your flapper seats nicely and directly over the drain.
2. Adjust The Water Level
The overflow tube guarantees that your tank does not
overfill and flood the floor. However, if the fill valve is set too high, there
will be a small leakage into the overflow tube and the bowl. The result is a
fill valve that automatically turns on, frequently topping up the tank. You can correct this problem in the
following way:
1. Re-set
the float's fill valve. Some valves have metal rods and small
clips you squeeze to slide the clip, thus floating up and down on the rod. If
this is the case, move the clip down to lower the water level. If it is an old
fill valve with a tank ball and long rod, cautiously bend the rod in the middle
to allow the ball to go slightly deeper into the tank.
2. Now, flush your toilet and let it refill and stop on its
own.
3. The water level should now be about ½ to 1 inch beneath
the top of the overflow tube.
4. If necessary, adjust the float, and flush again. Do this
until the refill stops at the correct level.
How to Fix a Flush Handle
This will most likely be one of the easiest installations
on your toilet. When the flush handle is disconnected from the tank or becomes
loose, the solutions will be one of the following:
Align the nut in the tank which holds the flush handle.
Tighten it by turning it counterclockwise. Please note that the nut holding
your flush handle from inside the tank is threaded in reverse. To loosen the
nut means you have to rotate it in the clockwise direction. Connect back the
lift wire. The last solution will be to install a new flush handle.
When fixing a new handle, you do not have to install the
exact type. There are many designs available in the hardware shops. To know if
a particular handle will fit your toilet, call customer service and give
them the toilet model and name and ask them to find out compatibility.
There are universal handles that fit almost any toilet. It
doesn't matter the type of lever your toilet has, though you may require some
minor adjustments.
Another way to get the correct handle is by purchasing the
same model as the one you currently have. You can also call the manufacturer,
and they can give you options.
Below
are the steps to install a new handle:
1. Open
the Tank
Take the lid out gently and place it aside on a towel,
especially if it is made of brittle porcelain. The handle is linked to a long
arm that is attached to a chain that lifts the flush valve. Identify the hole
that the chain is hooked to and unhook the clasp holding the chain to the arm.
2. Remove
the Old Handle
Using a crescent wrench, loosen the nut that holds the
handle in place. Do this with caution because most toilets have nuts with
left-handed threads. That means you have to turn it in the reverse direction
instead of turning clockwise like normal nuts.
Don't use force when loosening a nut because if you do, it
may crack. Add lubricant like WD-40 to the nut if it is rusted. After loosening
the nut, remove it by hand and smoothly move the arm through the hole.
3. Attach the New Handle
With a soapy sponge, scrub off
any rust stains or mildew that you may find around the handle hole. Take off
the nut from the new handle, and pop in the arm into the hole. Glide the nut
back over the arm and turn it by hand into the base of the handle. Remember,
it's probably a left-handed thread.
Firm it up using a crescent
wrench, but don't tighten it too much, or the porcelain may crack.
4. Attach
the Chain
Clip the chain to the same hole that was attached to the
old arm—test by flushing several times. The flush mechanism should open and
close completely. If the chain is too loose, it will not drain wholly. If the
chain is too tight, it will stop the flush valve from seating perfectly,
causing a continuous leak.
You can correct this by adjusting the chain down or up a link or two. You
may also test by trying another hole the chain can be
clipped to. When you are satisfied the flush is working well, replace the lid
onto the tank.
How To Fix a Leaking Toilet
This may look like a complex repair to do. However, it is
very simple. If you notice water around your toilet base, the following are
some of the possible causes:
· The
bolts that hold the toilet base to the floor might be loose, causing the toilet
to rock, breaking the wax ring seal. If this is the problem, every time the toilet
flushes, drain water seeps out at the toilet base.
· The
wax ring may be faulty. This could be due to the wax ring growing old and not
holding the toilet firmly at its base.
If possible, do not use your leaking toilet. The leaking
water is usually dirty causing nasty odors and potential health dangers.
Standing water could also damage the floor.
Tools
and Materials Needed
Depending on the cause of the water leak, you may require
one or more of the following:
· Bucket
· Sponge
· Tub
and tile caulk
· Hacksaw
(if needed)
· Putty
knife
· Work
gloves
· Adjustable
or open-end wrench
· Replacement
tee bolts
· Replacement
wax ring
· Toilet
tank insulation
· Toilet
tank drip tray
Method
A leaking toilet can be fixed by tightening the tee bolts.
You can do this by removing the plastic covers off the tee bolts on each side
of the toilet base. With an adjustable wrench, tighten the bolts. This will
make the toilet press down against the floor, subsequently compressing the wax
ring, restoring its function.
If this proves unproductive, the wax ring is probably worn
out or damaged. Go to the next step to replace the wax ring.
1. Disconnect
the Toilet
Start by buying the wax ring. Any generic wax ring will fix
your toilet well. Shut off the water to your bathroom. Do this by closing the
shut-off valve under the left side of the toilet tank. Next, flush the toilet.
This will drain all the water out from the tank into the bowl. With a sponge,
remove the remaining water in both the bowl and tank.
Go ahead and unscrew the nut that holds the fill valve tailpiece to the supply tube. Using an adjustable wrench, remove the tee bolts found at the base of the toilet. If the bolts are corroded and will not turn or continuously spin in place, use a hacksaw to sever the bolts.
2. Remove
the Toilet
After unbolting, lift the toilet carefully and set it on
its side. You might need to rock the toilet gently to break the seal. If you
are not gentle enough, the toilet could crack. Ask for help to do this, as
toilets have a bizarre centre of gravity, making it easy to drop them.
When you have removed the toilet, buy a new set of tee
bolts if they have corroded.
3. Remove
the Old Wax
Scrap away the old wax using a putty knife. Ensure you have
your gloves on, as grim builds over the wax rings as time passes by.
4. Install
the New Wax Ring
Place the new ring on the drain opening. Ensure the plastic
cone faces downwards into the drain. Afterwards, fix the tee bolts firmly in the
key openings on both sides of the drain flange.
5. Reinstall
the Toilet
Cautiously lift the toilet and place it down over the
drain, ensuring that the tee bolts thread up well through the holes at the base
of the toilet. Use your body weight to press down the toilet into the wax ring.
Also, rock it gently from one side to the other to compress the wax, creating a
watertight seal.
Put back the nuts and washers to the tee bolts and tighten
using a wrench. Ensure they are firmly fixed but not too tight. Remember, if
you tighten too much, the porcelain might crack.
6. Reconnect The Water Line
When you reattach the fill valve's tailpiece and the water
supply together, turn on the shut-off valve. If there are any leaks, tighten
the connections. When the toilet tank fills up, flush and check at the base to
ensure there are no leaks. If the toilet is no longer leaking, then your wax
ring has adequately sealed.
When you are sure that the wax ring is installed correctly,
run a bead of caulk and tub around the toilet base at the point the porcelain
is in contact with the floor.


No comments:
Post a Comment