HOMESLIBRO - Blogs on Home Related Solutions: Bathroom

Gives

  • News
  • Tips
  • Rates
  • Amazing!

Latest

Post Top Ad

Showing posts with label Bathroom. Show all posts

Guide for choosing bathroom lighting | Bathroom lighting ideas

October 16, 2022 0

CHOOSE BATHROOM LIGHTING

Bathrooms need to be well-lit so that they feel bright and welcoming and you can see what you’re doing if you’re shaving or applying makeup. However, bathroom lights also need to cope with the amount of moisture generated, particularly if you have a shower in the room, so make sure you choose suitable fixtures.


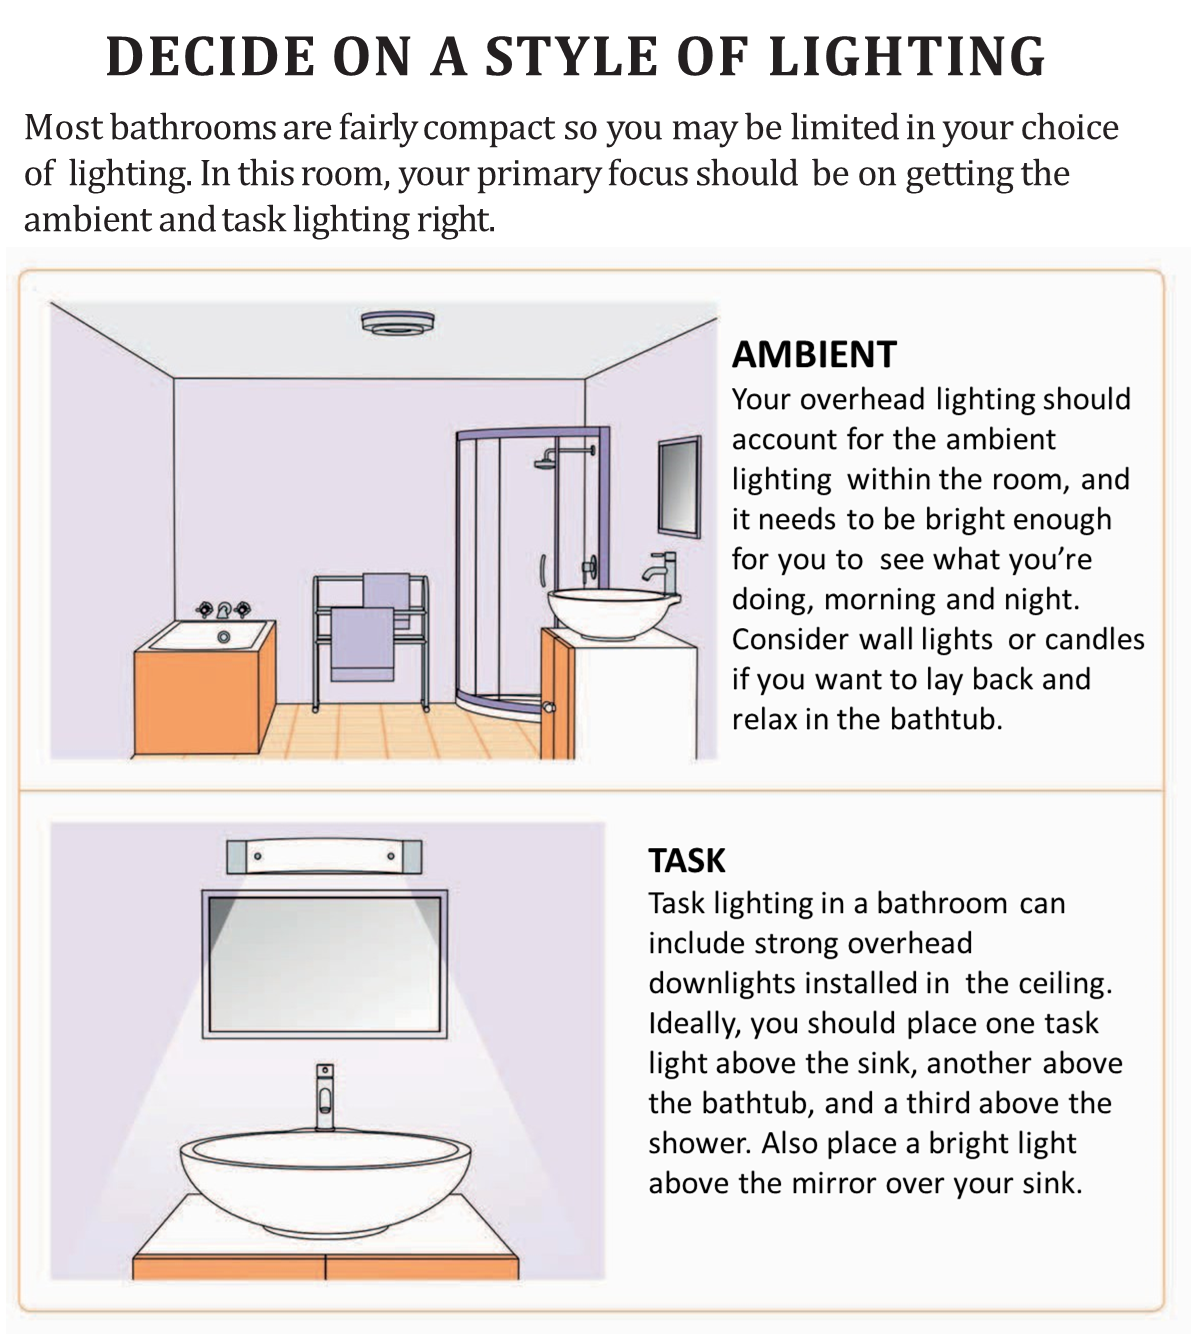
DECIDE ON A STYLE OF LIGHTING

Most bathrooms are fairly compact so you may be limited in your choice of lighting. In this room, your primary focus should be on getting the ambient and task lighting right.
CHOOSE BATHROOM LIGHTING

 
Read More

How to tile grouting on bathroom wall tiles | how to grout ceramic wall tile

October 05, 2022 2

TILE AND GROUT BATHROOM WALLS

The sequence below shows how to tile around two sides of a bathtub, but the principles can be applied to creating a backsplash around a sink, and other simple tiling jobs. After the old tile is removed, check the concrete board for any cracks or chips; either fill in the cracks or replace the concrete board, if necessary.


WHAT YOU NEED

Drop cloths

Masking tape

Wall filler and sandpaper  (optional)

Dish detergent and soap or  tack cloth

Sponge

Wall paint

Small- or medium-sized  paintbrush

Roller and tray


PLAN THE PLACEMENT

PLAN HOW TO ARRANGE the tiles by propping the first row up against the wall around the edge of the bathtub. Use whole tiles,  placing tile spacers in between, and ascertain whether these will fill the space. If you will need to add cut tiles, leave a gap in the corner.

TILE AND GROUT BATHROOM WALLS

 
Read More

How to choose Flooring and Wall covering for the bathroom? - Homeslibro

September 17, 2022 0

HOW TO CHOOSE FLOORING FOR THE BATHROOM?

One of the most important considerations when decorating your bathroom is the flooring you use.  Not only does it need to look good, but it also should be nonslip, durable, easy to clean, comfortable to walk on bare feet, and, most importantly, moisture- and humidity-resistant.


HOW TO CHOOSE THE LOOK FOR THE FLOOR? 

Wood, tiles, and seamless flooring can all look contemporary, while the former two are better choices for a period-style room.  Tiles and seamless flooring stand up better to moisture; wood is less water-resistant, but is a viable option if you love the look.

CHOOSE FLOORING FOR THE BATHROOM

 
Read More

Guide to Choose the Right toilet for your bathroom - Homeslibro

September 01, 2022 0

While the toilet might not be the focal point of your bathroom, you should still pay attention to its design.  By doing so, you will ensure that it fits in with the rest of the room’s scheme, might save you valuable space if you need it, could be easier to clean, and may help you economize on water usage.


CHOOSE THE TYPE

The type of toilet you choose will largely depend on whether you prefer a contemporary or traditional look to the room.  You will also need to consider where it will be placed, and whether you prefer the look of a one- or two-piece toilet.

GUIDE TO CHOOSE A TOILET
Read More

GUIDE TO CHOOSE BATHROOM FAUCETS - HOMESLIBRO

August 26, 2022 0

GUIDE TO CHOOSE BATHROOM FAUCETS -  HOMESLIBRO

When choosing faucets for your bathroom, style is just one consideration. You should also check that your preferred options will work with your water supply (standard pressure is fine for most modern faucets but some require a higher pressure), as well as being compatible with your sink or bathtub.


CHOOSE THE TYPE


Before you choose which type of faucet you need, first decide whether it must be—or you want it to be—mounted on the bathtub or sink, the counter surface, or the wall. (If your sink or bathtub has predrilled holes, your decision is already made.)

GUIDE TO CHOOSE BATHROOM FAUCETS


Read More

GUIDE TO CHOOSE A BATHROOM SINK/WASH-BASIN FOR YOUR BATHROOM - HOMESLIBRO

August 24, 2022 0

The size of your bathroom and the suite you choose may predetermine your choice of the sink, but with so many different shapes and styles available, where to start? Consider practical issues, such as storage needs and how many people use the bathroom at one time, as well as the look you want to achieve.


CHOOSE THE TYPE

Each of these basic sink types comes in a range of styles, from square, contemporary shapes to curvaceous lines suited to traditional rooms. Sizes vary, too, with big sinks for family use and small sinks best for bathrooms where space is an issue.

How to Choose a Bathroom Sink

 
Read More

Guide to choosing the best shower for your bathroom - Homeslibro

August 22, 2022 0

Installing the right shower can make all the difference in helping you get your day off to a good start  or wind down completely at the end of it. Assess your space, consider all the options, and don’t forget to check that your preferred choice will work with your water supply before you finalize your decision.


CHOOSE YOUR SHOWER ARRANGEMENT

There are plenty of ways to create a stylish, practical showering area. Depending on the space available, you have the choice of installing a shower over your bathtub, installing a stall shower or walk-in enclosure, or creating a dedicated wet room.

Guide to choose the best shower for your bathroom


STALL SHOWER

If you have a shower enclosure separate from your bathtub, a stall shower with a prefabricated base is usually the simplest and most cost-effective way of doing it. A separate shower, without a bathtub, is fine in an en suite or second bathroom. Still, removing the household’s only bathtub is not advisable to accommodate a stand-alone shower unit.


WET ROOM

Ideal for bigger areas, walk-in showers and wet rooms have become very popular in recent years and are contemporary, stylish, and spacious. A wet room needs to be waterproofed, with a  shower drain set into a  sloping floor.


TUB-SHOWER

If your bathroom is tiny with no space for a  separate shower, you may need to install a tub shower above the bathtub and add a shower curtain or screen.


DECIDE ON SIZE AND SHAPE

While a wet room will be custom-fitted to suit your space, there is a finite range of stall shower shapes and sizes to choose from.  Here are the main options. (If you are combining your shower area with your bathtub, see pages 90–91 for bathtub shapes.)

Guide to choose the best shower for your bathroom


SQUARE

Square shower bases are very versatile since they can be positioned in a corner,  along a wall, or in the centre of a large room. They are available in a range of sizes,  although it is worth picking the largest size your bathroom can accommodate, to make your showering experience less cramped.


RECTANGULAR

A rectangular-shaped shower is a perfect choice if you have a bit more space to play with in your bathroom. The benefit of these shower bases is that they give you more room to move around while you’re showering. Like square shower bases, they are available in many different sizes.


PENTAGONAL

Essentially square in shape, but with a triangular section on one side of the base sliced away, this type of shower is a space-saving solution to suit a smaller bathroom. The shower is designed to be tucked neatly into one corner of the bathroom to take up minimal floor space.


QUADRANT

Also suitable for compact areas, this type of shower base is curved rather than angular at the front. It requires a matching curved shower screen, and the base and screen give a smoother look to a bathroom. Offset quadrant bases provide a little more space in which to shower than a regular quadrant base.


CHOOSE A SCREEN

A shower screen can add a touch of class to your bathroom, as well as protect the surrounding area from water damage.  What you go for will largely be dictated by your choice of shower arrangement, but there are still things you need to consider.

Guide to choose the best shower for your bathroom


Read More

Guide to Choose a Bathtub for your bathroom - Homeslibro

August 20, 2022 0

Guide to Choose a Bathtub for your bathroom - homeslibro


When it comes to choosing a bathtub, you need to consider how much space you have, and how you will use it—do you like to spend hours soaking, or prefer to shower? You also need to think of practicalities:  a deep bathtub may look luxurious, but it will take longer to fill and weigh more than a conventional bathtub.


CHOOSE THE SHAPE

The shape of the bathtub you choose depends on the size and proportions of your bathroom. For example, your awkwardly shaped bathroom may be most suited to a corner bathtub, or you may only have room for a standard rectangular tub.

Guide to Choose a Bathtub for your bathroom


Read More

Guide on Layout Considerations In The Bathroom - Homeslibro

August 18, 2022 0

LAYOUT CONSIDERATIONS IN THE BATHROOM

A bathroom requires careful planning, so before thinking about how you’d like it to look, consider the practical issues—how the room will be used, and which individual components will work best. Will more than one person regularly use the room at the same time? Do you need to make space for double sinks?  Should you install a separate shower? How can the room be organized to make it work well for everyone?


BATHTUB

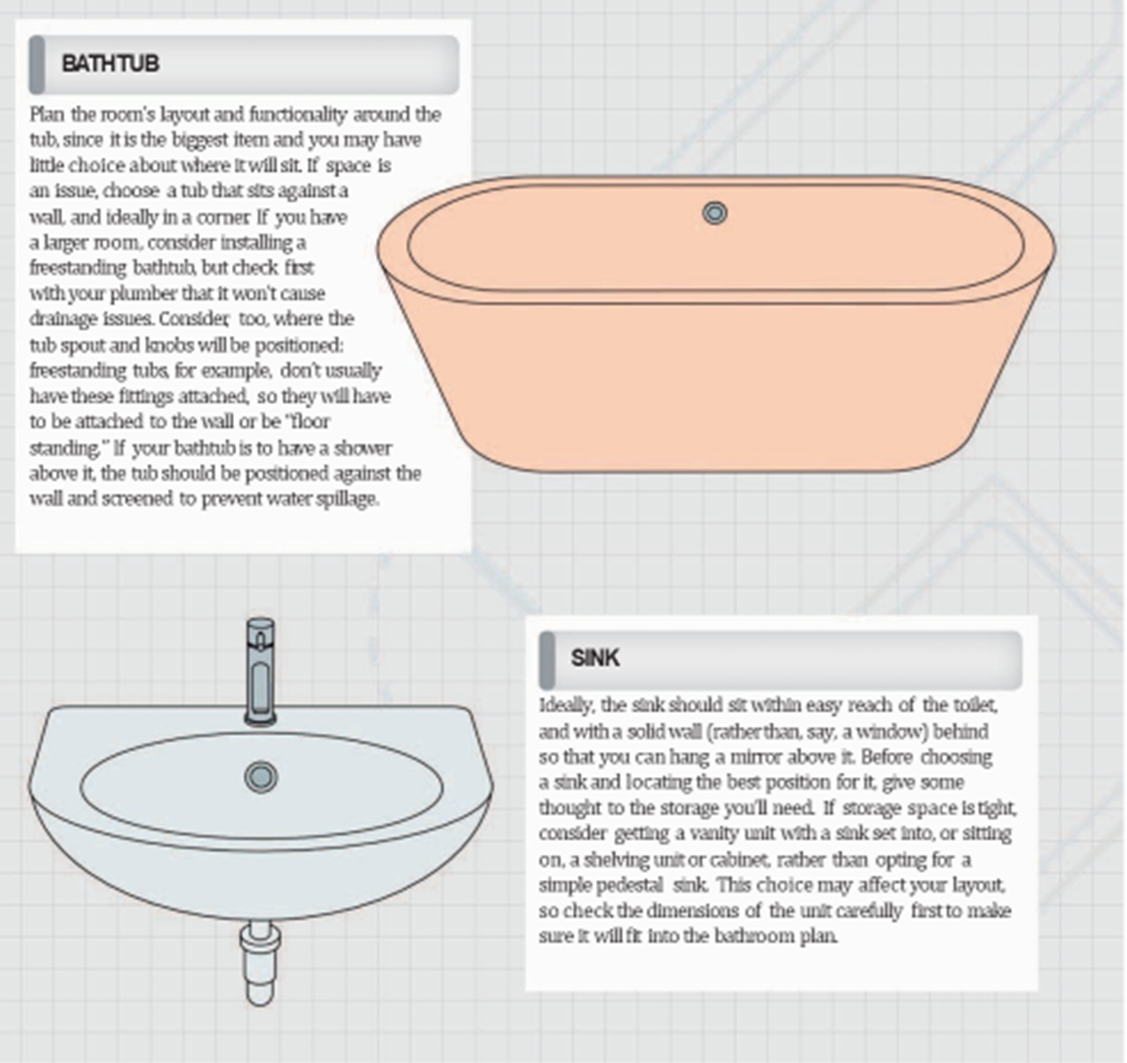
Plan the room’s layout and functionality around the tub, since it is the biggest item and you may have little choice about where it will sit. If space is an issue, choose a tub that sits against a  wall, and ideally in a corner. If you have a larger room, consider installing a  freestanding bathtub, but check first with your plumber so that it won’t cause drainage issues. Consider, too, where the  tub spout and knobs will be positioned: freestanding tubs, for example, don’t usually  have these fittings attached, so they will have  to be attached to the wall or be “floor  standing.” If your bathtub is to have a shower above it, the tub should be positioned against the wall and screened to prevent water spillage.

LAYOUT CONSIDERATIONS IN THE BATHROOM

 
Read More

What to Do When Renovating Your Bathroom | 14 Step Guide For Bathroom Remodelling

August 12, 2022 0

WHAT TO DO WHEN RENOVATING YOUR BATHROOM

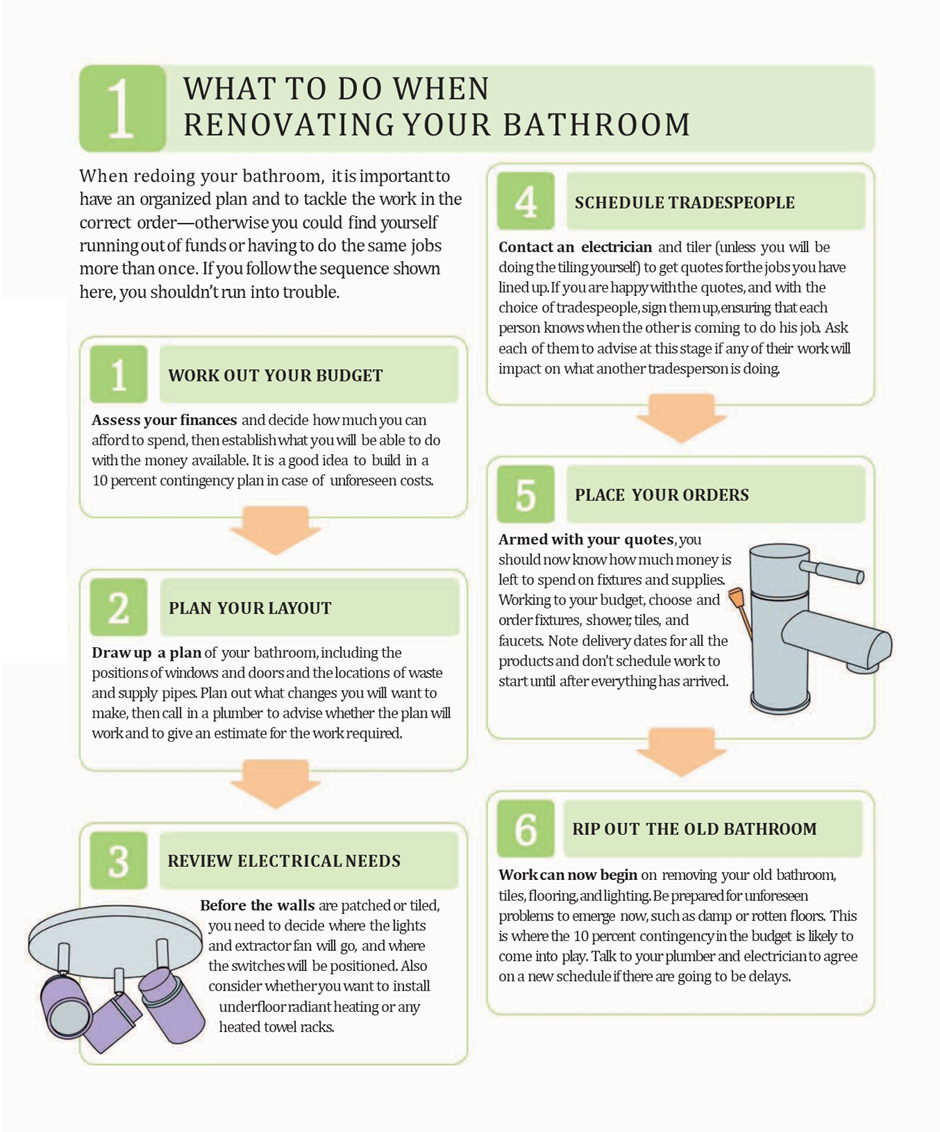
When redoing your bathroom, it is important to have an organized plan and to tackle the work in the correct order—otherwise, you could find yourself running out of funds or having to do the same jobs more than once. If you follow the sequence shown here, you shouldn’t run into trouble.


1. WORK OUT YOUR BUDGET

Assess your finances and decide how much you can afford to spend, then establish what you will be able to do with the money available. It is a good idea to build in a  10 per cent contingency plan in case of unforeseen costs.

RENOVATING YOUR BATHROOM


Read More

DIY - How to Fix a Slow Sink Drain - HOMESLIBRO

February 23, 2022 0

 How to Fix a Slow Sink Drain


This is a very common problem in the bathroom. The slow drain's primary cause is a clog up by the hair, soap, and other foreign debris.

The sink in your RV can experience an overflow problem just like that in a house. They also get clogged because of hair, grease, soap, etc., preventing the water from draining smoothly. For this, a plunger will unclog it, and if it does not work, you can use drain cleaners that are safe for plastic pipes.


How to Fix a Slow Sink Drain


This is a problem that is easy to fix if it has happened in our homes. There are five ways to solve this problem, as explained below:


Remove Debris Using a Zip-It Tool


One way you can get rid of a slow-draining sink is by using a Zip-it tool. This is an affordable tool that works wonders in a few minutes. When you slip the Zip-it tool inside the drain, it will catch debris, including hair, and then remove it. Repeat until the drain is clear.


Remove the Pop-up

If the Zip-it tool did not clean out all the debris, or you do not have one, then you can apply this method. Simply remove the pop-up, which will have some debris like soap stuck onto it. Thoroughly clean it and place it back in the drain. There's a pop-up nut that's behind the sink, which you press down to bring it out.

How to Fix a Slow Sink Drain


Use a Homemade Cleaner

You don't need to use harsh chemicals to clear your drain. You can use homemade remedies that are inexpensive and work just as well. A homemade cleaner removes the remaining debris after the larger particles have been pulled out using a Zip-it tool or cleaned out a sink pop-up.

First, pour boiling water down the drain. Afterwards, mix ½ cup of vinegar with

½ cup of baking soda, and let flow down the drain. Wait for 10 minutes and pour boiling water down the drain again. Finally, flush the drain with normal hot tap water.


Clear the Sink Overflow

The sink overflow drains water if it accidentally rises too high in the sink. It also allows air into the drain, helping the water to flow faster into the drain. However, debris can build up over time in the sink overflow, causing the sink to drain slowly. It would be best if you cleaned the overflow regularly.

The following are steps on how to clean your sink overflow:

Materials Needed:

·       Two or three quarts of boiling water

·       A sink-cleaning brush or pipe cleaner

·       A tube made of silicone or any other non-heat conducting material


Method

Push the sink-cleaning pipe into the overflow, in and out many times. That will lift out the gunk and build-up. After you are sure that all debris is out, stick the funnel into the hole. Pour boiling water through it and into the overflow. This action will loosen any leftover gunk and debris. Be careful as you do this to prevent scalding yourself with the boiling water. Repeat as required.


Fix the Slow Drain Using a Plunger

Take a cup plunger and cover it over the sink drain. Plunge it several times to loosen and dislodge hair or any other foreign debris. For more effective results, use duct tape to cover the overflow to create a seal and then plunge. More debris will be cleared out this way.


Read More

DIY - How to Fix a Leaking Faucet? | Homeslibro

February 23, 2022 0

How to Fix a Leaking Faucet?

Fixing a faucet in an RV is almost similar to that in the home. Since most of the plumbing pipes in RVs are plastic, usually no tools are required as the faucet can be easily unscrewed using your hands. Before embarking on repairing or replacing a new faucet, just as in a house, turn off the primary water source in your RV. This is usually from the freshwater tank.

The solution to this problem is to remove and replace the cartridge inside the faucet.


Materials Needed

1.  Adjustable wrench

2.  New cartridge

3.  Cartridge puller

4.  Handle puller

5.  Pocket knife or awl

6.  Flat head screwdrivers

7.  Towel


Procedure

1. Shut off the water supply.

How to Fix a Leaking Faucet


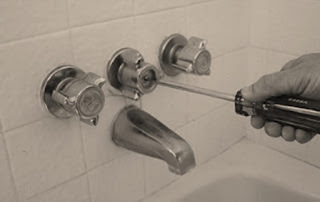
2. With a little pressure, use an awl or pocketknife to remove the handle cap that's in the middle of the shower faucet. A screw should be visible now.


3. Use the screwdriver to remove the handle screw. If the handle cannot come off easily, use a handle puller.


4. Use a screwdriver to pull out the retaining clip that rests on top of the cartridge. The clip looks like a small horseshoe.


5. Remove the washer that's fixed around the middle of the cartridge. Unfasten the nut and hex screw with your wrench.


How to Fix a Leaking Faucet

6. Pull out the cartridge with your pliers. Replace it with a new cartridge whose model is exactly like the one you have removed. Follow the instructions carefully to align the new cartridge correctly.


7. Turn on your shower and check if there are any leaks.


Please note you have done all you could to fix your leaking showerhead. If it continues to leak, then you can call in a professional plumber.


Read More

DIY - How To Fix a Leaking Shower - Homes libro

February 23, 2022 1

How To Fix a Leaking Shower

We all enjoy taking our hot showers, especially after a long hard day at work. You also love them in the morning to freshen you up before you start your day. While a leaking shower may not interfere with your wonderful hot showers, it can increase your water bill significantly.

It is challenging to know the cause of a leaking shower, which is usually behind the wall. You can start by fixing the showerhead and call a plumber later to find out the real cause of the leak. To do this:


Materials Needed

1.  Teflon tape

2.  Old toothbrush

3.  Distilled white vinegar

4.  Large bowl

5.  Crescent wrench

6.  Pliers

7.  Rubber O-ring

8.  Plastic washer

9.  Towel


Method

Remove the Showerhead

Before you do this, shut off the water valve to the bathroom. You can usually find it near the shower or in the basement. You may also opt to turn off the main water line. Removing the showerhead can be done easily using your hand.


1. Clench the showerhead, and turn it counterclockwise to unscrew it, disconnecting it from the pipe.

2. If it does not loosen easily, hold the shower pipe with one hand and turn it using your other hand.

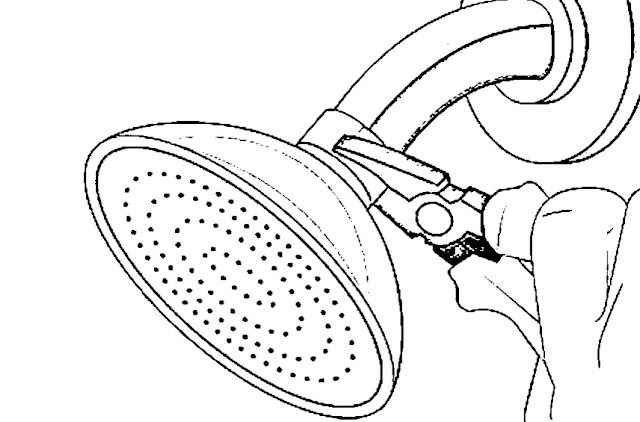
3. If you still cannot remove it using your hands, use a crescent wrench or pliers and remove it from the wall.


How To Fix a Leaking Shower


Replace the Washers

If the washers or the O-rings are worn out or damaged, replace them. If they are in good shape, use Teflon tape to re-wrap the threads on the pipe. The tape seals the gaps between the piping and showerhead.


Clean The Showerhead

Do this when the showerhead is off the wall. Immerse the showerhead in a bowl of vinegar and allow it to sit for two hours. Afterward, rinse the showerhead in hot water. Take an old toothbrush and wash between the nozzles. Use a clean towel to dry the showerhead.


Reconnect Back the Showerhead

You can reattach the showerhead using your hand. If this does not work, use a wrench or pliers to tighten until it fits well. Do not tighten too much, as you might need to open it frequently to clean it.

Turn on the water and check if the shower still leaks. If it does, then there's another solution, which is fixing a leaking faucet.

Read More

DIY Toilet Repairs | Toilet Clog | Running Toilet | Leaking Toilet

February 19, 2022 0

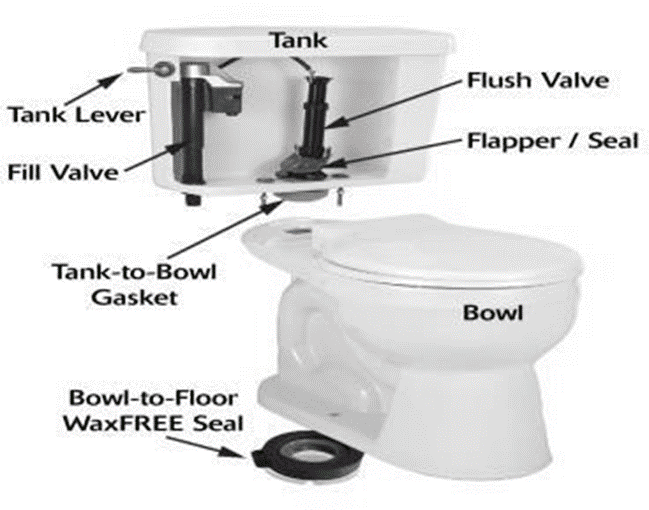
Your toilet comprises two main parts; the upper tank, which holds the water released when you flush the toilet, and the bowl unit, which rests on the floor. The bowl is made up of porcelain with no moving parts, and very rarely does it need repairs. The tank, however, is where most of the repairs happen. You'll be surprised at how easy it is to fix toilet problems.

Before you embark on any repairs, you need to comprehend how a toilet works.


How Your Toilet Works

The tank above the toilet bowl holds a certain quantity of water. When you flush your toilet, the water flows down fast through an opening at the bottom of the tank and into the bowl. The force pushes the waste from the bowl and into the drain, and finally into the sewer lines.


How Your Toilet Works

Two main parts in the tank make this possible: the fill valve or ballcock and the flush valve.


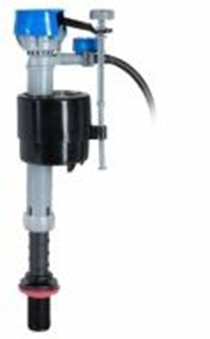
The Toilet Fill Valve (Ballcock)

Toilet Fill Valve


The toilet fill valve is the component that fills the tank with water. It is located on the left side of the tank and is automatic. When you flush and the water is released, the water level will fall. It will also automatically shut off when all the water drains into the bowl. The water then rises again to a specific level in the tank. The valve is operated by a floating cup or floating ball, which moves up and down with the water level- it all depends on your toilet's design. The non-floating fill valve operates by sensing the pressure of the water at the bottom of the tank.

The toilet in your RV is lighter than regular toilets and does not have a handle like a home toilet. Instead, it has a pedal that is underneath the bowl. It is flushed by pressing the pedal with a foot, causing freshwater to flow into the toilet, and a flap opens at the bowl's base. The waste is flushed into the black tank.


Some common toilet problems that a beginner can repair easily include:

·       A clogged toilet

·       A leak at the toilet base

·       A running toilet

·       A faulty flush valve

·       A ballcock that doesn't function properly


Below, find three types of repairs that you can do by yourself.


Clearing Toilet Clog With a Toilet Plunger

An overflowing toilet due to clogging can be annoying. Such a clog can cause the water to fill up the toilet and spill over onto your floor. This is usually no cause for panic. It's a fairly effortless job.

Before you learn how to unclog a toilet, it will be a good idea to understand what causes it to clog.


How does the toilet get clogged?

There's a P-trap under your toilet that holds standing water that acts as a trap and also prevents sewer gas odors from filling up the air. Sometimes, objects get trapped in the P-trap, which includes toilet waste or any other foreign object.

A toilet clog can quickly be cleared using a toilet plunger. If that doesn't work, then use a toilet auger.


Tools Needed

·       Toilet plunger

·       Closet plunger


Method

1. Use A Toilet Plunger (Also Called A Closet Plunger Or A Flanged Plunger)

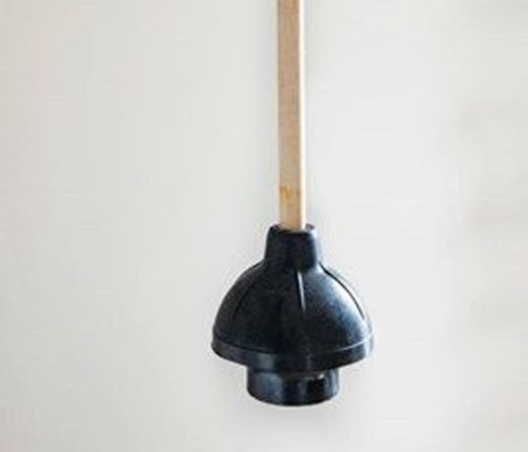
This type of plunger looks like the cup plunger but is slightly different in shape and design. It has a cup with a soft rubber flap that fills out from inside the cup. The flap fits perfectly over the curved toilet drain, providing the appropriate suction required.

The suction force in a toilet plunger is strong enough to unclog an RV toilet if the clog is close to the top. If the clog is much deeper down in the black tank, a plunger will not solve your problem.

This issue can be solved by pouring boiling water down the toilet bowl and let it stay that way the whole night. You can break up a stubborn clog by using boiling water in a tank that is not full yet.

Toilet Plunger


Do not use the toilet plunger for your sink, and do not use the cup plunger for your toilet. Check out the difference below so that you do not confuse the two:

Toilet Plunger


2. Prepare the Plunger

Add more water into the toilet bowl so that it is half full or as needed. This is done to secure a seal around the drain opening.


3. Position the Plunger

Lower the plunger at an angle into the bowl so that the cup fills with water. This increases the plunging force. Fit the cup properly over the drain opening so that the flange is inside while the cup seals firmly outside the hole.


4. Pump the Plunger

Use powerful, swift thrusts to push the plunger up and down the drain to loosen the clog. During all movements, maintain a good seal. As the plunger comes up, it creates a suction effect to make the clog lose. As it moves down, it pushes the clog down the drain.


Thrust it five or six times. When most of the water has gone out of the bowl, most likely, the clog has cleared.


5. Test it

Flush your toilet to test if it has cleared. If the bowl appears like it will overflow, push down the flapper in the water tank. This stops the water flow immediately from the tank into the bowl.

Repeat the flushing and plunging process until the clog has cleared up.


Clearing the Clog With a Toilet Auger


Toilet Auger

1. Prepare the Auger

Pull back the auger cable so that the cable's tip is at the end of the guide tube. Push in the guide tube into the toilet, allowing the sweep elbow to rest at the bottom of the bowl and so that the cable end reaches farther into the drain opening.


2. Crank the Auger

By cranking the auger's handle clockwise, push the cable slowly into the toilet trap until it cannot go any further.

If need be, you might have to reverse the direction of the crank to coax the cable through the curves of your toilet drain. Extend the auger cable until you break through the clog.


Crank the Auger


3. Extract the Cable

As you rotate the handle, drag the cable back slowly out of the toilet. Be gentle as you do this to avoid scratching the fixture. Make sure the clog has cleared by flushing the toilet. 


How To Fix a Running Toilet

A running toilet is one of the common problems in homes, not to mention how annoying it can be and all the water wasted. Fortunately, it is very easy to fix this problem.

Before you start fixing your toilet, learn some basics on how it works.


How the Toilet Works

How the Toilet Works


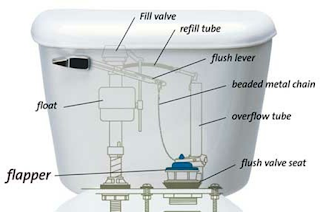
Understanding the basics of how a toilet works will give you an idea of what repairs are required. Here are the basic steps:

1. After you press the handle, a chain will lift a flap (flapper), which allows the water in the tank to flow into the bowl. As the tank is emptying, the flapper will drop and close the opening to start the refill cycle again.


2. The float drops as the tank empties the water. The float connects to the float valve, which opens when the float is down and closes when the tank fills up.


3. At the centre of the tank is an overflow tube, which helps in draining any excess water down into the bowl when the tank level gets high. Besides this tube is a channel that the float valve sends water down into the bowl when it refills again.


A toilet that doesn't stop running can result from various reasons, including waterlogged float, a high water level, and a faulty flapper. If none of these is the problem, then most likely, your toilet has a broken valve. The ultimate solution is to replace it. Below are two ways to handle this problem:


1. Check if Your Flapper or Chain Is Faulty

A flapper refers to a cap made of plastic or rubber, which helps in keeping water in your tank. With time, the flapper becomes brittle and creates a faulty seal. When your tank cannot hold or refill water, it is probably because of a sub-par flapper. The following are ways to troubleshoot your flapper:


1. Check the consistency of the flapper. In most instances, the flapper has hardened and stopped creating an adequate seal. Feel the flapper to establish if it is still soft and can hold back the water.

2. Check the chain. If the chain in your water tank is too long, trim off the excess part to avoid tangling. If the chain is rusty, replace it with a new one.

3. Check if there is a jam. Sometimes flappers get pinched at the hinges. Adjust this so that it works as required.

4. Check for alignment. Flappers can get dislodged, causing leaks. Ensure your flapper seats nicely and directly over the drain.


2. Adjust The Water Level

The overflow tube guarantees that your tank does not overfill and flood the floor. However, if the fill valve is set too high, there will be a small leakage into the overflow tube and the bowl. The result is a fill valve that automatically turns on, frequently topping up the tank. You can correct this problem in the following way:

1. Re-set the float's fill valve. Some valves have metal rods and small clips you squeeze to slide the clip, thus floating up and down on the rod. If this is the case, move the clip down to lower the water level. If it is an old fill valve with a tank ball and long rod, cautiously bend the rod in the middle to allow the ball to go slightly deeper into the tank.

2. Now, flush your toilet and let it refill and stop on its own.

3. The water level should now be about ½ to 1 inch beneath the top of the overflow tube.

4. If necessary, adjust the float, and flush again. Do this until the refill stops at the correct level.


How to Fix a Flush Handle

This will most likely be one of the easiest installations on your toilet. When the flush handle is disconnected from the tank or becomes loose, the solutions will be one of the following:

Align the nut in the tank which holds the flush handle. Tighten it by turning it counterclockwise. Please note that the nut holding your flush handle from inside the tank is threaded in reverse. To loosen the nut means you have to rotate it in the clockwise direction. Connect back the lift wire. The last solution will be to install a new flush handle.

When fixing a new handle, you do not have to install the exact type. There are many designs available in the hardware shops. To know if a particular handle will fit your toilet, call customer service and give them the toilet model and name and ask them to find out compatibility.

There are universal handles that fit almost any toilet. It doesn't matter the type of lever your toilet has, though you may require some minor adjustments.

Another way to get the correct handle is by purchasing the same model as the one you currently have. You can also call the manufacturer, and they can give you options.


Below are the steps to install a new handle:

1. Open the Tank

Take the lid out gently and place it aside on a towel, especially if it is made of brittle porcelain. The handle is linked to a long arm that is attached to a chain that lifts the flush valve. Identify the hole that the chain is hooked to and unhook the clasp holding the chain to the arm.


2. Remove the Old Handle

Using a crescent wrench, loosen the nut that holds the handle in place. Do this with caution because most toilets have nuts with left-handed threads. That means you have to turn it in the reverse direction instead of turning clockwise like normal nuts.

Don't use force when loosening a nut because if you do, it may crack. Add lubricant like WD-40 to the nut if it is rusted. After loosening the nut, remove it by hand and smoothly move the arm through the hole.


3. Attach the New Handle

With a soapy sponge, scrub off any rust stains or mildew that you may find around the handle hole. Take off the nut from the new handle, and pop in the arm into the hole. Glide the nut back over the arm and turn it by hand into the base of the handle. Remember, it's probably a left-handed thread.

Firm it up using a crescent wrench, but don't tighten it too much, or the porcelain may crack.


4. Attach the Chain

Clip the chain to the same hole that was attached to the old arm—test by flushing several times. The flush mechanism should open and close completely. If the chain is too loose, it will not drain wholly. If the chain is too tight, it will stop the flush valve from seating perfectly, causing a continuous leak.

You can correct this by adjusting the chain down or up a link or two. You

may also test by trying another hole the chain can be clipped to. When you are satisfied the flush is working well, replace the lid onto the tank.


How To Fix a Leaking Toilet

This may look like a complex repair to do. However, it is very simple. If you notice water around your toilet base, the following are some of the possible causes:

·       The bolts that hold the toilet base to the floor might be loose, causing the toilet to rock, breaking the wax ring seal. If this is the problem, every time the toilet flushes, drain water seeps out at the toilet base.

·       The wax ring may be faulty. This could be due to the wax ring growing old and not holding the toilet firmly at its base.

If possible, do not use your leaking toilet. The leaking water is usually dirty causing nasty odors and potential health dangers. Standing water could also damage the floor.


Tools and Materials Needed

Depending on the cause of the water leak, you may require one or more of the following:

·       Bucket

·       Sponge

·       Tub and tile caulk

·       Hacksaw (if needed)

·       Putty knife

·       Work gloves

·       Adjustable or open-end wrench

·       Replacement tee bolts

·       Replacement wax ring

·       Toilet tank insulation

·       Toilet tank drip tray

Method

A leaking toilet can be fixed by tightening the tee bolts. You can do this by removing the plastic covers off the tee bolts on each side of the toilet base. With an adjustable wrench, tighten the bolts. This will make the toilet press down against the floor, subsequently compressing the wax ring, restoring its function.

If this proves unproductive, the wax ring is probably worn out or damaged. Go to the next step to replace the wax ring.


1. Disconnect the Toilet

Start by buying the wax ring. Any generic wax ring will fix your toilet well. Shut off the water to your bathroom. Do this by closing the shut-off valve under the left side of the toilet tank. Next, flush the toilet. This will drain all the water out from the tank into the bowl. With a sponge, remove the remaining water in both the bowl and tank.

Go ahead and unscrew the nut that holds the fill valve tailpiece to the supply tube. Using an adjustable wrench, remove the tee bolts found at the base of the toilet. If the bolts are corroded and will not turn or continuously spin in place, use a hacksaw to sever the bolts.


2. Remove the Toilet

After unbolting, lift the toilet carefully and set it on its side. You might need to rock the toilet gently to break the seal. If you are not gentle enough, the toilet could crack. Ask for help to do this, as toilets have a bizarre centre of gravity, making it easy to drop them.

When you have removed the toilet, buy a new set of tee bolts if they have corroded.


3. Remove the Old Wax

Scrap away the old wax using a putty knife. Ensure you have your gloves on, as grim builds over the wax rings as time passes by.


4. Install the New Wax Ring

Place the new ring on the drain opening. Ensure the plastic cone faces downwards into the drain. Afterwards, fix the tee bolts firmly in the key openings on both sides of the drain flange.


5. Reinstall the Toilet

Cautiously lift the toilet and place it down over the drain, ensuring that the tee bolts thread up well through the holes at the base of the toilet. Use your body weight to press down the toilet into the wax ring. Also, rock it gently from one side to the other to compress the wax, creating a watertight seal.

Put back the nuts and washers to the tee bolts and tighten using a wrench. Ensure they are firmly fixed but not too tight. Remember, if you tighten too much, the porcelain might crack.


6. Reconnect The Water Line

When you reattach the fill valve's tailpiece and the water supply together, turn on the shut-off valve. If there are any leaks, tighten the connections. When the toilet tank fills up, flush and check at the base to ensure there are no leaks. If the toilet is no longer leaking, then your wax ring has adequately sealed.

When you are sure that the wax ring is installed correctly, run a bead of caulk and tub around the toilet base at the point the porcelain is in contact with the floor.


Read More

Post Top Ad