HOMESLIBRO - Blogs on Home Related Solutions: Repair-Maintenance

Gives

  • News
  • Tips
  • Rates
  • Amazing!

Latest

Post Top Ad

Showing posts with label Repair-Maintenance. Show all posts

Types of Cracks in load bearing walls | How to measure cracks | Causes of cracks

December 03, 2022 3


We can classify the masonry walls of a building into two types. The first type is the load-bearing walls of a building in which all the loads are carried down to the foundation through the walls. The second type of wall is the walls in reinforced concrete framed buildings or partition walls where the walls are designed as filler walls and not as load-bearing walls. In this article, we deal mainly with some of the causes of cracks in load-bearing walls. We also briefly discuss the filler walls.


Cracks in Load Bearing Walls

The main walls in buildings are usually 11/2 brick or one brick walls in thickness (Partition walls can be even half-brick walls.) The cracks in buildings (both in masonry and concrete works) are classified as follows according to the width of the cracks:

1. Less than 1 mm cracks are called thin cracks.

2. 1 mm to 2 mm cracks are medium cracks.

3. 2 mm to 4 mm cracks are wide cracks.

4. More than 4 mm cracks are very wide cracks.


Measurement of Cracks

When we see any crack in a structure, we show our interest in its size and try to find out whether it is an active (growing) crack or a passive (does not become bigger with time) crack. The size of a crack (or crack width) is measured by means of a crack gauge. There are different types of gauges. One type is shown in the Figure below. This type of crack gauge has different widths marked on it. We measure crack width by comparing the crack width with the different sizes marked in the scale and thus, find the size.


Crack gauge.

Crack gauge.

To find out whether it is an active or passive crack, we measure the crack with the passing of time by using the crack gauge or glass strip technique, as shown in the glass strip is pasted normally to the crack. It breaks if the crack is active.


Measurement of the progress of cracks

Measurement of the progress of cracks (a) glass tell-tale for observing movements of cracks and (b) glass tell-tale for measuring movements of cracks.


Causes of Cracks

The first step in the treatment of cracks is to find their cause after which it is easy to treat the cause and then, repair the cracks.

Some of the reasons for the formation of a crack in a load-bearing wall can be one or more of the following reasons:

1. Defective rendering and plastering (shrinkage cracks)

2. Settlement of the foundation in a load-bearing wall or other settlement in the wall

3. Temperature effects

4. Local deformation at junctions of masonry with concrete members like concrete slabs bearing on masonry walls.

5. Cracks in half brick partition walls.

Some of these causes along with their remedies are briefly explained in the subsequent articles.


Read More

How to Repair of Rising Dampness in walls of Ground Floors in Buildings?

December 01, 2022 5

How to Repair Rising Dampness in walls of Ground Floors in Buildings Constructed without DPC? and How to Repair Efflorescence in Buildings?


Introduction

The plinth is the portion of the wall of a building immediately above ground level to the ground floor level. This height usually ranges from 45 cm to 100 cm. Nowadays, in building construction, we provide a beam at the lower or upper level of the plinth, called the plinth beam. It is usually 10 cm thick with at least 6 mm rods spaced at 10 cm at the top and the bottom and 6 mm stirrups at the rate of 23 cm. (This is in addition to the grade beam or ground beam we provide at the foundation level for isolated footings, under reamed piles, etc.)

In all buildings, nowadays, we build a damp-proof course (DPC) to prevent dampness from going up the walls from the foundation due to the capillary action of groundwater. The damp-proof course can be on the plinth beam or on a beam built separately always above the ground level. If it is built separately, it should be at least 40 mm to 50 mm thick and should have 1:2:4 concrete with a waterproofing compound. Over this, we paint a thick layer of bitumen to prevent water from rising from the wall from the foundation. A much cheaper way for low-cost buildings is to put only a 1:3 cement mortar layer with bituminous paint (or a bituminous membrane placed over it) in a portion of the wall above the ground. This should be provided for all walls, i.e., external, and internal walls. Thus, DPC prevents water from rising from the wall from the foundation by capillary action. Even though in all the new buildings, nowadays, we place the DPC, in old buildings like old assembly halls, old church buildings, and old residences, these are absent. How we prevent moisture migration in these old buildings where DPC has not been provided is the major problem dealt with in this article.


Methods to Rectify Dampness

The following methods are usually recommended:

1. Construct a new DPC (Note: Conventional type consists of 40 mm to 50 mm thick cement concrete in the proportion of 1:2:4 with water-proofing compound.)

2. Pressure injection or gravity feeding of a suitable chemical solution within the plinth (Water soluble silicon solutions are commonly used.)

3. Pressure injection of resin mortar in boring holes


Construction of New DPC

For installing a DPC in an old building that has been built without DPC, we cut the mortar bed joint of two brick courses above ground level in stages of about one meter in length at a time. No two adjacent lengths should be repaired consecutively. A new DPC with a waterproofing compound can be inserted with the rebuilding of the removed brick course. This method is too slow and may lead to structural settlement and cracking of walls if the walls are weak. Hence, the methods described in the subsequent section are usually recommended.


Method of Injection of Chemicals (Silicon)

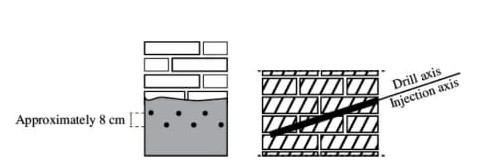
Another method of repair is the injection of chemicals as a liquid. The most common method used for placing DPC is based on injecting water-soluble silicon (which has the moisture-resisting property) into the brickwork, as shown in Figure below.

How to Repair of Rising Dampness in walls
Read More

How to Repair Rc beams and columns Damaged by steel corrosion? - Homeslibro

November 30, 2022 0

In this article, we will explain the repair process for Reinforced concrete beams and columns damaged by steel corrosion where the depth of the affected concrete has reached the reinforcement level. As the amount of steel rust exceeds that of the original steel, the concrete around the steel cracks. In some cases, the cover concrete may fall off. Corrosion can be caused by carbonation or chloride.

The following procedure is followed to repair these reinforced concrete members. The main difference between slabs from columns and beams is that for the latter, a more elaborate formwork must be used to place the concrete. Otherwise, we can place concrete with shotcrete


Repair of Cracks in Beams and Columns when Corrosion has Reached Reinforcement Level

Step 1: As these members carry heavy loads, first support the beam and column using supports to relieve part of its load. Then, remove the damaged concrete to expose the steel.


Step 2: Investigate the type of corrosion with phenolphthalein tests to determine whether the corrosion is due to carbonation or chloride effect. Also, determine the depth to which erosion has continued. If it's due to carbonation, it's worth fixing. But if it is due to chloride corrosion, the same corrosion can occur elsewhere if the concrete near the steel is not completely replaced. Here, we assume that carbonation is the only cause of corrosion.


Step 3: If the steel is completely corroded, remove 15mm to 25mm of concrete from the entire steel.

Step 4: Clean the concrete surface and steel surface thoroughly with water. A rust removal solution can also be used for steel. It dissolves the rust and adheres to the steel as a coating.


Step 5: When the steel is reduced by about 15% due to corrosion, place the necessary additional steel and bond it properly with the old steel or additional support. New steel can also be supported by spot welding to old steel. Place required shear reinforcements for beams and binders for columns.


Step 6: Apply proper bonding coat to the old concrete surface and steel surface.


Step 7: If necessary, attach the formwork to the column for concreting the removed area. For columns, it is easy to place formwork or self-compacting concrete for pouring concrete. For beams, it is more convenient to use expanded wire mesh


Step 8: Before the bond coat dries, compact the void space of the member with cement, sand, small coarse aggregate (10mm and below) and micro concrete with superplasticizer as required. Water-cement ratio should not exceed 0.5. In some cases, we may have to use self-compacting concrete. This is achieved by using concrete chemicals such as superplasticizers. For patch repairs or repairing small areas, we usually use simple polymer-modified cement mortar. For larger repairs, it is better if we use shotcrete to fill the removed area.


Step 9: Apply a 1:3 (finely sanded) coating within 48 hours of completing Step 8.


Step 10: Wet curing should be done for at least 7 days.


Step 11: After complete drying, a coat of waterproof paint is given to protect the member and match the surrounding surfaces. Note: In larger jobs, it is better to place concrete or mortar using shotcrete, also known as gunite.

Rc beams and columns Damaged by steel corrosion

 
Read More

know How to Repair Reinforced concrete slabs with bottom falling and Lack bond?

November 29, 2022 0

know How to Repair Reinforced concrete Old slabs with the bottom falling off due to steel corrosion and New Reinforced Slabs with bottom plaster falling off due to lack of bond


There are many cases where the part below the steel layer of the RC roof or floor slab has collapsed. We can divide the reasons for this failure into two headings.

Case 1: Is the falling off the bottom of the slab after many years due to corrosion of steel.

Case 2: Is that of the bottom layer falling off soon after plastering during the construction of the slab due to lack of bond.

In this article, we explain the repair of these two cases.


Case 1: Old Slabs with the Bottom Falling Off Due to Steel Corrosion

Corrosion of steel and cracking of the underside of older RC roofs is very common. Usually, in the case of roof slabs and slabs under the bathroom, corrosion of steel occurs due to leakage and water seepage. The RC slab below fig shows corroded steel below. When this occurs in other intermediate floor layers, the steel corrosion can be determined by a phenolphthalein test. Then it can happen again. Also, old twisted high-yield bars (Tor steel) usually rust faster compared to modern hot-rolled high-strength steel bars. So, if we add any steel, let it be hot rolled bars. Before starting work, prop the RC slab in some places. It's good to support.


know How to Repair Reinforced concrete slabs

Read More

How to Repair of Concrete Affected by Steel Corrosion - homeslibro | lceted

November 29, 2022 0

Repair of Concrete Affected by Steel Corrosion

In this article, we have explained how to repair the corrosion of steel in reinforced concrete members. As we know, steel corrosion not only corrodes steel but also affects the concrete around the steel in the structure and causes its cracking. This is due to the carbonation of concrete. We proceed as follows for repairs:

1.   First, we make a visual observation of the problem.

2.   Then, we determine the nature of corrosion whether it is carbonation or chloride induced.

The nature of corrosion, as we can see with our eyes, also tells us how corrosion has taken place, Therefore, it clarifies whether it is due to carbonation or chloride effect. Now, the treatment of the corroded structure is explained here depending on its nature.


Procedure for Repair of Carbonation-Induced Corrosion

If the cracking of concrete is due to carbonation-induced corrosion of steel, we can have two distinct cases of the state of corrosion, namely,

1.   Where the carbonation has not reached the level of steel

2.   Where it has reached the level of steel

Test for the extent of carbonation can be carried out by spraying 0.2% solution of phenolphthalein indicator on freshly chipped concrete which is in contact with steel and also on the concrete near the reinforcement. The change in colour of the concrete indicates that the concrete is in good condition. When there is no change in colour, it shows that it is carbonation-affected concrete. The pH value can also be found by analysing the samples of mortar collected by drilling, dissolving them in distilled water and conducting titration. There can be two cases of corrosion which are to be treated as follows:


Case 1: (where the carbonation depth has not reached the reinforcement level)

In this case, we are concerned with carbonation for a small depth only. The crack can be sealed by widening it and placing a polymer-modified cement slurry. In important cases, we may use injection grouting with grouting nipples and slurry pumps.


Case 2: (where the carbonation depth has reached reinforcement level)

This is a bad case. In this case, we proceed along the following steps after supporting the member with external supports to carry the load on the member, if necessary.

Step 1: Remove all the defective concrete that has been carbonised and expose the reinforcement bars. If the bars are rusted very much, then it is good to remove the concrete so as to give a clear air gap all around the steel of about 15 mm in slabs and up to 25 mm in beams and columns. (This is a must in chloride corrosion.) Clean the steel thoroughly with a wire brush and manual labour or by shot blasting or other means. We may use a water jet to clean the surface. Rust remover chemicals are also available for easy removal of rust. Additional steel with necessary supports may have to be provided if needed. This addition is compulsory if the rusted steel is around or over 15%. It can be tied or welded to old steel.


Step 2: Apply a corrosion-inhibiting slurry coat to steel using acrylic polymer and cement (with 43-grade cement) in a ratio of 1:5. Alternately, use an epoxy bonding coat with no cement. These chemicals are available in the market. (In the former days, we used to paint the steel with red oxide chromium paint. Two coats one after the other at intervals of not less than four hours were specified.


Step 3: Make the exposed concrete damp (but not saturated) with water. Apply a bond coat of latex or acrylic-modified cement slurry (using commercially available chemicals) over the concrete surface. This coat is applied to bond the old concrete with the new concrete or mortar (as described in step 4). If this bond coat is not applied, the old concrete and new concrete will not stick together. (These bond coats are conventional cement slurry to which we add chemicals like synthetic latex.)


Step 4: Replace the concrete that we have removed with latex-modified concrete (with small aggregates) or with latex-modified mortar. This work should be carried out before the bonding coat dries up. Compact this concrete wall.


Step 5: Apply to cure paint on the finished surface for curing without watering or use the conventional method of curing the concrete (or mortar) with wet gunny bags for 7 days.


Step 6: Apply decorative paint after curing to match the surrounding surfaces.


Note: There is also ready-to-use mineral-based one-component material which acts as a combined corrosion inhibitor and bond coat. One such chemical is Zentrifix KMH of MC Bauchemie available in the market. A 100 parts by weight of this material is slowly added to 20–25 parts by weight of water and mixed thoroughly. This is applied to the prepared steel and prewetted concrete as corrosion inhibitors and bonding coats.


Repair of Chloride Induced Corrosion

There can be two cases under this head that are as follows:

Case 1: Corrosion due to chlorides in the concrete used for construction

This is the worst case. The sand, water or aggregate used to make the concrete may have contained chlorides. shows the formation of corrosion by voltaic action. This case is very difficult to cure, as the cause is internal. It is better to rebuild the structure. For temporary relief, we may proceed as follows: In this case, for repair, we have to completely remove the concrete around the steel, leaving a clear gap. We then carry out the operations of cleaning both steel as well as concrete, applying bonding coats and filling the space with very good concrete and small aggregates mortar. As corrosion can occur at any place of the structure, it is better to rebuild the member rather than make frequent repairs.


Repair of Chloride Induced Corrosion
Read More

7 WAYS TO REFRESH A TIRED KITCHEN | BUDGET KITCHEN IDEAS | CHEAP KITCHEN UPDATES

August 06, 2022 0

7 WAYS TO REFRESH A TIRED KITCHEN | BUDGET KITCHEN IDEAS | 7 CHEAP KITCHEN UPDATES


If your kitchen looks a little tired, give it a fresh new look by making small changes, such as replacing cabinet hardware or changing the colour of a wall. If you are feeling more ambitious, you can  make bigger changes that, although they will require a little more time and effort, can create more impact.


1. CREATE A FEATURE WALL

Add interest to your kitchen by painting or wallpapering one wall in an eye-catching colour or pattern.

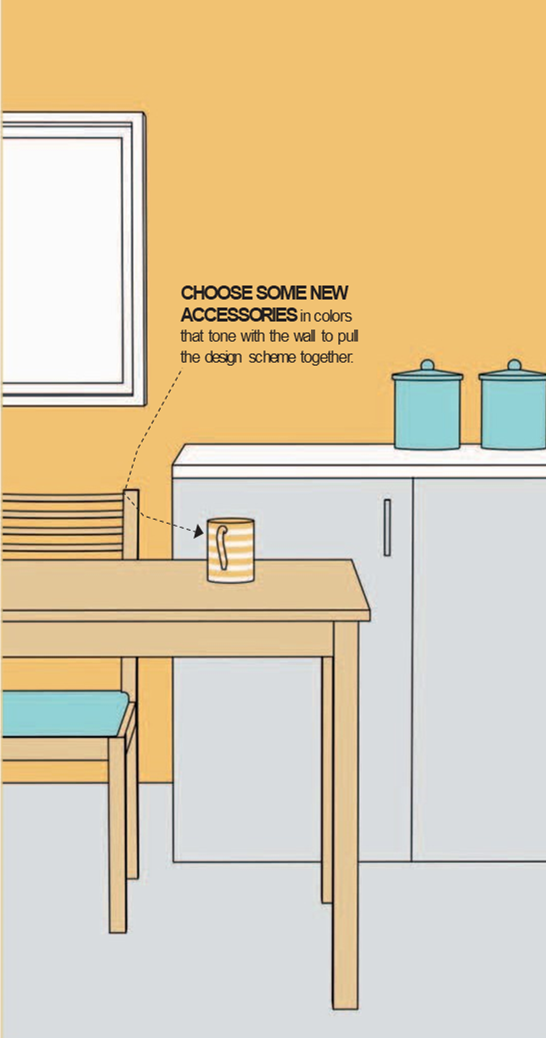
CHOOSE SOME NEW ACCESSORIES in colours that tone with the wall to pull the design scheme together.


7 WAYS TO REFRESH A TIRED KITCHEN


Read More

HOW DO REPAIR OF CRACKS IN BRICKWORK IN BUILDINGS?

May 07, 2022 0

HOW DO REPAIR OF CRACKS IN BRICKWORK IN BUILDINGS?

Cracks in the walls are caused by different movements caused by temperature, solution of the foundation, shrinkage and so on. From the nature of the cracks, we can infer the seat of motion. As shown in the figure below, the line normally drawn to the line of cracks intersects the seat of the settlement. Any leaks in the drains and consequent softening of the soil or other types of settlements or movements may cause these cracks.


The first step before the repair of cracks is to find the cause of the cracks and try to remedy the cause. For example, if the cause is due to foundation movement, it is worthwhile to proceed as follows:


(A) If there is any leakage in the drain, ditches or manholes, it will soften the basement soil and cause different settlements. Such leaks must be prevented.


(B) In clay soils, the foundation may be reinforced (for example, by placing brickwork below the untreated ground level). In more severe cases, the basement soil can be improved by lime injection or other means. Otherwise, the foundation can be reinforced with the foundation.

REPAIR OF CRACKS IN BRICKWORK IN BUILDINGS


Read More

Maintenance of Buildings | Guide For Your Home Maintenance - HOMESLIBRO

May 06, 2022 0

In this article, we will very briefly consider some of the other major items of maintenance that we should carry on to keep the building in good shape. Good maintenance enhances not only the beauty and performance but also the useful life of the building.


Maintenance of Buildings

Read More

Maintenance Methods For Different Types Of Floor | Homeslibro

April 17, 2022 0

MAINTENANCE OF FLOORINGS

There are many types of floors and each has its own methods of maintenance. These are discussed further.


Marble Floors

Daily maintenance is to be made by mopping with a mild detergent in water. Marble can easily get stained and scarred. The lighter the colour the more easily the stains can be detected. If there is a spill, it should be wiped out immediately. If these are stubborn stains, proceed as follows:


1. If the stain is from grease, make a paste of chalk dust or whiting with acetone. This mixture is applied to the stain and allowed to stand overnight. Sponge off the mixture and buff the treated area.


2. If the stain is from an organic source such as tea, fruit juice, or carbonated beverages mix, use the chalk powder with hydrogen peroxide instead of acetone. Rust stains can also be removed by this paste. If the above process dulls the surface, sprinkle marble polishing powder (tin oxide) and rub it down with thick cloth or an electric buffer. Stubborn dirt can be removed by dry borax and damp cloth followed by rinsing with warm water.


Granite and Other Stone Floors

Mopping with mild detergent and water at regular intervals will keep the floor in good shape.


Terrazzo Floors

For a period of at least three months after the terrazzo floor has been laid, it should be swabbed daily using clean water and a clean rough swab (floor cloth) which should be rinsed frequently in water to avoid dirt being carried back onto the floor. The floor is then allowed to dry. If the floor is dirty, water and a mild soap may be used to clean it. The soap should be completely removed by mopping as otherwise it will be deposited on the floor making it slippery and dull looking. After this initial cleaning, ordinary swabbing will keep the floor shining.


It is seldom possible to remove oil and grease, if spilt on the floor, and if they are allowed to penetrate below the surface. However applying a paste made by a powder such as hydrated lime and marble dust, or whiting with benzol or clear gasoline over the stain, and then wash after 12 hours can be used as described in section


Acid polishing of terrazzo floors (using oxalic acid) is usually carried out after machine polishing during the first laying of the floor. This can be repeated if needed. For this purpose, oxalic acid is dusted over the surface at the rate of 35 g per sq m of the surface sprinkled with water and rubbed hard with a pad of woollen rag. The following day the floor is wiped with a moist rag and washed clean with water. Acids such as dilute hydrochloric acid should not be used for cleaning mosaic floors.


PVC Floors

PVC flooring subject to normal usage may be kept clean by mopping with soap solution using a clean damp cloth. The traces of soap should be removed by mopping. Water should not be poured over the PVC flooring for cleaning as it may seep through the joints and cause the adhesive to fail. The floor may be periodically polished to keep up its appearance. It should not be overwaxed and if it develops this condition, it should be cleared with white spirit or paraffin.


Linoleum Floors

Mopping with white kerosene oil can pick up all the dirt from linoleum floors. After removing all the dirt, the floor can be wiped with water and mopped well to get a polished surface. As in the case of PVC floors, excess water and alkaline soaps should not be used for cleaning linoleum floors.


Block-wood Floors

All wood floors should be kept clean and the blocks should not become loose. The floor is cleaned and kept bright by polishing with beeswax or ready-made wax polish.


Ceramic (Glazed and Vitrified) Tile Floors

Ceramic tiles are easy to maintain. Soap and water can be used to clean them. Special care should be taken to clean the joints (unless jointless tiles are used for the flooring). Any stains can be removed by any of the methods used for other floors or even by the household methods of using a cut lemon.


FAQ

What kind of floor is easier to maintain?

Vinyl flooring


What type of flooring is durable?

Tile flooring


What flooring is best for the kitchen?

Tile flooring.


Read More

DIY - How to Fix a Slow Sink Drain - HOMESLIBRO

February 23, 2022 0

 How to Fix a Slow Sink Drain


This is a very common problem in the bathroom. The slow drain's primary cause is a clog up by the hair, soap, and other foreign debris.

The sink in your RV can experience an overflow problem just like that in a house. They also get clogged because of hair, grease, soap, etc., preventing the water from draining smoothly. For this, a plunger will unclog it, and if it does not work, you can use drain cleaners that are safe for plastic pipes.


How to Fix a Slow Sink Drain


This is a problem that is easy to fix if it has happened in our homes. There are five ways to solve this problem, as explained below:


Remove Debris Using a Zip-It Tool


One way you can get rid of a slow-draining sink is by using a Zip-it tool. This is an affordable tool that works wonders in a few minutes. When you slip the Zip-it tool inside the drain, it will catch debris, including hair, and then remove it. Repeat until the drain is clear.


Remove the Pop-up

If the Zip-it tool did not clean out all the debris, or you do not have one, then you can apply this method. Simply remove the pop-up, which will have some debris like soap stuck onto it. Thoroughly clean it and place it back in the drain. There's a pop-up nut that's behind the sink, which you press down to bring it out.

How to Fix a Slow Sink Drain


Use a Homemade Cleaner

You don't need to use harsh chemicals to clear your drain. You can use homemade remedies that are inexpensive and work just as well. A homemade cleaner removes the remaining debris after the larger particles have been pulled out using a Zip-it tool or cleaned out a sink pop-up.

First, pour boiling water down the drain. Afterwards, mix ½ cup of vinegar with

½ cup of baking soda, and let flow down the drain. Wait for 10 minutes and pour boiling water down the drain again. Finally, flush the drain with normal hot tap water.


Clear the Sink Overflow

The sink overflow drains water if it accidentally rises too high in the sink. It also allows air into the drain, helping the water to flow faster into the drain. However, debris can build up over time in the sink overflow, causing the sink to drain slowly. It would be best if you cleaned the overflow regularly.

The following are steps on how to clean your sink overflow:

Materials Needed:

·       Two or three quarts of boiling water

·       A sink-cleaning brush or pipe cleaner

·       A tube made of silicone or any other non-heat conducting material


Method

Push the sink-cleaning pipe into the overflow, in and out many times. That will lift out the gunk and build-up. After you are sure that all debris is out, stick the funnel into the hole. Pour boiling water through it and into the overflow. This action will loosen any leftover gunk and debris. Be careful as you do this to prevent scalding yourself with the boiling water. Repeat as required.


Fix the Slow Drain Using a Plunger

Take a cup plunger and cover it over the sink drain. Plunge it several times to loosen and dislodge hair or any other foreign debris. For more effective results, use duct tape to cover the overflow to create a seal and then plunge. More debris will be cleared out this way.


Read More

DIY - How To Fix a Leaking Shower - Homes libro

February 23, 2022 0

How To Fix a Leaking Shower

We all enjoy taking our hot showers, especially after a long hard day at work. You also love them in the morning to freshen you up before you start your day. While a leaking shower may not interfere with your wonderful hot showers, it can increase your water bill significantly.

It is challenging to know the cause of a leaking shower, which is usually behind the wall. You can start by fixing the showerhead and call a plumber later to find out the real cause of the leak. To do this:


Materials Needed

1.  Teflon tape

2.  Old toothbrush

3.  Distilled white vinegar

4.  Large bowl

5.  Crescent wrench

6.  Pliers

7.  Rubber O-ring

8.  Plastic washer

9.  Towel


Method

Remove the Showerhead

Before you do this, shut off the water valve to the bathroom. You can usually find it near the shower or in the basement. You may also opt to turn off the main water line. Removing the showerhead can be done easily using your hand.


1. Clench the showerhead, and turn it counterclockwise to unscrew it, disconnecting it from the pipe.

2. If it does not loosen easily, hold the shower pipe with one hand and turn it using your other hand.

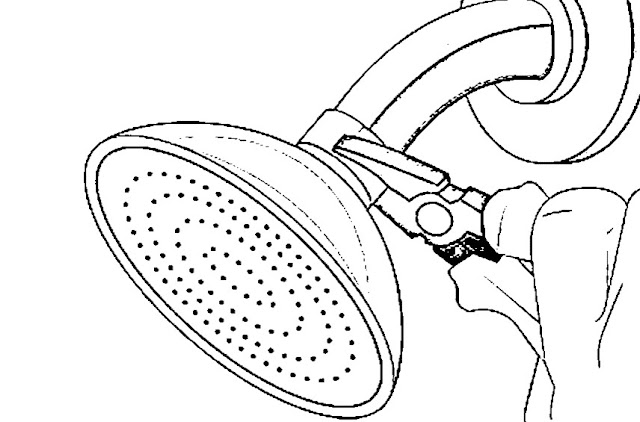
3. If you still cannot remove it using your hands, use a crescent wrench or pliers and remove it from the wall.


How To Fix a Leaking Shower


Replace the Washers

If the washers or the O-rings are worn out or damaged, replace them. If they are in good shape, use Teflon tape to re-wrap the threads on the pipe. The tape seals the gaps between the piping and showerhead.


Clean The Showerhead

Do this when the showerhead is off the wall. Immerse the showerhead in a bowl of vinegar and allow it to sit for two hours. Afterward, rinse the showerhead in hot water. Take an old toothbrush and wash between the nozzles. Use a clean towel to dry the showerhead.


Reconnect Back the Showerhead

You can reattach the showerhead using your hand. If this does not work, use a wrench or pliers to tighten until it fits well. Do not tighten too much, as you might need to open it frequently to clean it.

Turn on the water and check if the shower still leaks. If it does, then there's another solution, which is fixing a leaking faucet.

Read More

Architectural standards for residential construction - homeslibro

February 23, 2022 0


In this article, we have a collection of interior dimensions with some other important things, for residential construction


HUMAN SCALES

HUMAN SCALES

Read More

DIY Kitchen Installations | Dishwasher | Kitchen Pipe | Kitchen Faucet - Homeslibro

February 13, 2022 0

Just as you do not need to panic and call in a plumber when plumbing repairs are required, there are kitchen installations that you can do for yourself, even as a beginner, in your home or RV. You can easily handle installing a dishwasher, replacing a kitchen pipe, and installing a kitchen faucet.

Ensure to check if you require permits from your local authority to carry out specific installations.


Installing A Dishwasher

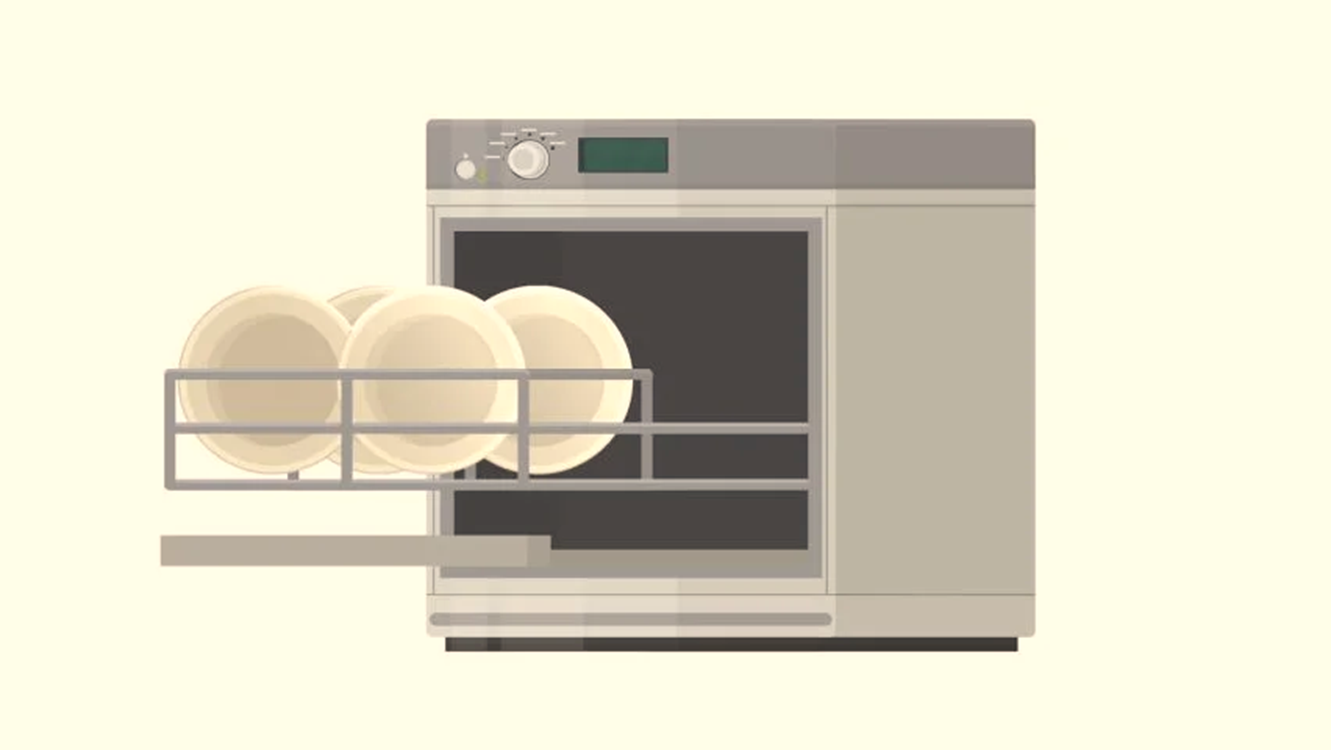
Installing A Dishwasher

Read More

How to Clean a Garbage Disposal Sink - Homeslibro

February 12, 2022 0

How to Clean a Garbage Disposal Sink

When your kitchen sink starts to give off a bad smell, removing your drains and debris is a sure sign that you need to clean up.

Garbage removal usually cleans itself by breaking down food particles and pouring them down the drain, keeping the room relatively clean. However, over time, the scrubbing action in the grinding chamber can create foul-smelling sludge in uncleaned areas.

Cleaning it every week is a great way to prevent bad odours.


Supplies Needed

Ø Rubber gloves

Ø Sink stopper

Ø Dish soap

Ø A kitchen sponge with an abrasive side

Ø ½ to 1 cup vinegar

Ø ½ cup baking soda

Other optional fresheners that you may use instead of vinegar include baking soda, rock salt, beach solution, or citrus peels.


Method


1. Turn off the power to avoid the disposal turning on accidentally as you clean.


2. Disconnect the disposal from the outlet under the sink. You can also turn off the breaker from the service panel in your home.


3. Apply the soap onto an abrasive sponge and scrub under the baffle, reaching the creases and the folds. Rinse the sponge often to get rid of the entire gunk.


4. Thoroughly clean the top of the grinding chamber, not forgetting to rinse the sponge many times. Repeat until no more gunk is pulled out by the sponge, leaving a clean feel.


5. For a fresh, clean feel, pour ½ cup of baking soda into the disposal. Afterwards, slowly pour ½ cup of vinegar into the disposal. The mixture will fizz up.


6. Cover the drain opening with the sink stopper to trap the fizzing process inside the disposal.


7. Wait a few minutes before removing the stopper. Afterwards, turn on the garbage disposal and pour hot water into the drain.


8. If need be, repeat all the steps.

Read More

Post Top Ad